Quizmaster’s Utility
User Guide
Download and Install
To install Quizmaster’s Utility, download and run the installer: QMUtilitySetup.exe
The program requires .NET 4.5.2 to run. If it’s not already installed, the setup program will help you install it before installing the Quizmaster’s Utility.
When the installation is complete, the program should launch.
Quizmaster’s Utility will auto-update when it is launched with an active internet connection. I recommend doing this from time to time to get any changes or bug fixes.
Loading Questions
Before you can generate a question set, you need to import a QM Data set. These can be downloaded from https://sbq.quizzing.live/quizmaster/ and updates will be posted there as the questions are revised.
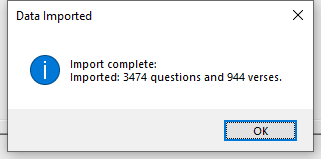
To import a data set either, open a .qmdata file from anywhere on your computer, this will launch the program, or from the File menu, choose Import Questions and select a .qmdata file. In either case, a dialogue will display when the import is complete.
Generating a Set
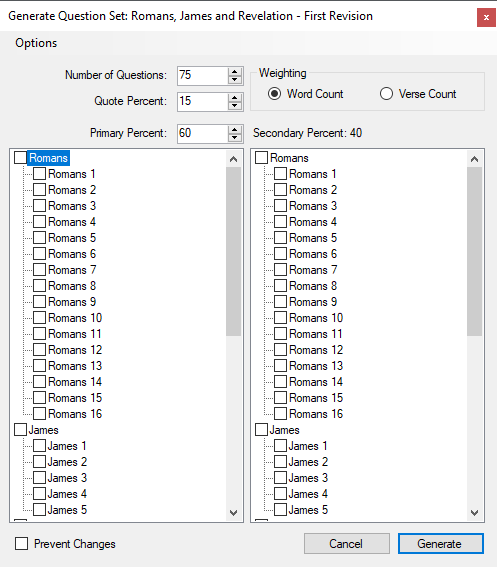
To generate a set, from the File menu, choose New Quiz (Ctrl+N).
In the title bar of the new quiz dialogue is the name of the loaded data set. You can use this to verify that all sites have the same version of the questions.
Number of Questions is just that, the size of the set.
Quote Percent is the percentage of that size that should be ‘Quote?’ questions.
Primary Percent controls the number of questions selected from each group. A chapter can belong to either the Primary or the Secondary group. (or neither)
Prevent Changes disables all the controls.
Verse by Verse
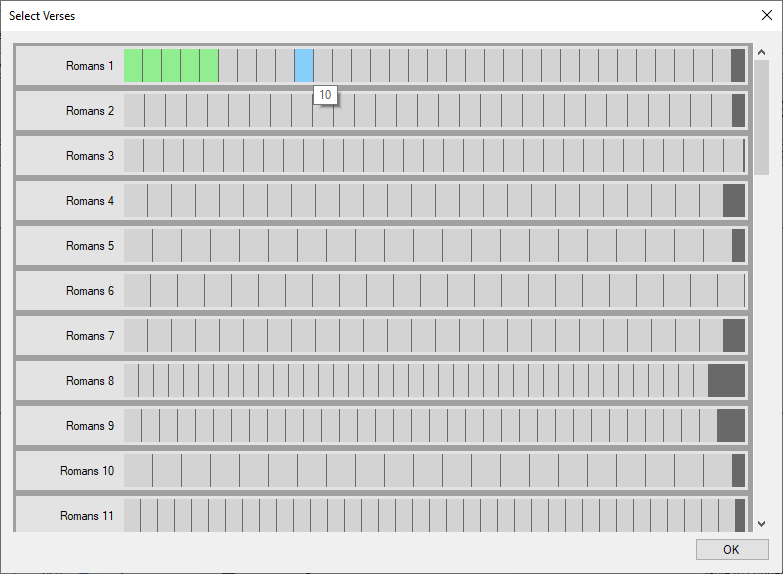
If you want finer control over the verses selected, enable Verse by Verse under the Options menu. With verse by verse enabled, you can use the Verses button to open the Select Verses dialogue.
In this dialogue, there is a row for each chapter in the data set.
The boxes to the right of the chapter name represent the verses in that chapter.
Hovering over a verse box will display the verse number, and clicking will select/deselect that verse. Clicking and dragging over several verse boxes will select/deselect all of them. Clicking on the chapter name will select/deselect the entire chapter.
Note that selected verses will only be included in the set if that chapter is also selected in the New Quiz dialogue.
Opening a Set
To open a question set, from the File menu, choose Open (Ctrl+O)
If you want to use Quizmaster’s Utility to display questions but don’t want to generate them in the program, you can open question sets that you have created outside of the program. This is especially useful for quiz demos or other events that don’t use the official questions.
The program can open sets that are in a TSV (Tab Separated Value) format.
See Formats
Options
Team Settings
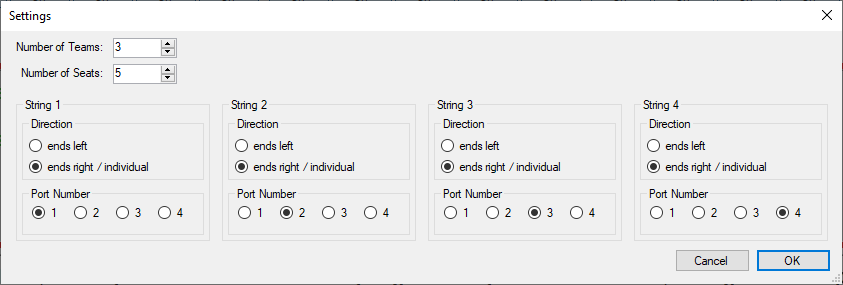
To configure teams and seats, from the Options menu, choose Team Settings (Ctrl+T).
Number of Teams is what it seems, and Number of Seats lets you choose how many seats those teams have.
Direction flips the order of the pads. This setting is relevant if you’re using an old string of connected pads instead of the individual pads.
Port Number refers to the port on the hub that the pads are plugged into. This setting is useful if a port goes bad.
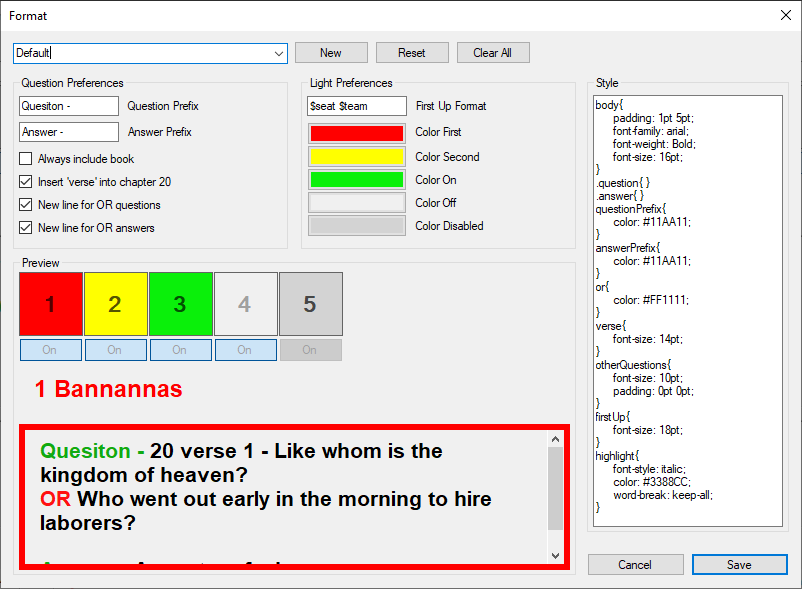
To change how something is displayed, from the Options menu, choose Format Settings (Ctrl+F).
The dropdown at the top allows you to select presets. The buttons to the right let you create a new preset or reset the current preset. To rename a preset, type the new name into the preset selection box.
Clear All deletes all the presets, so use it with intent.
Under Question Preferences, you can change how the text in the question box is formatted, and under Light Preferences, you can change the format of the First Up text as well as light colors.
Under Style, you can edit the CSS used to render all the text boxes.
Any changes will instantly update the preview, and remember that you can always reset to the default style.
The Main Window
Teams and Seats
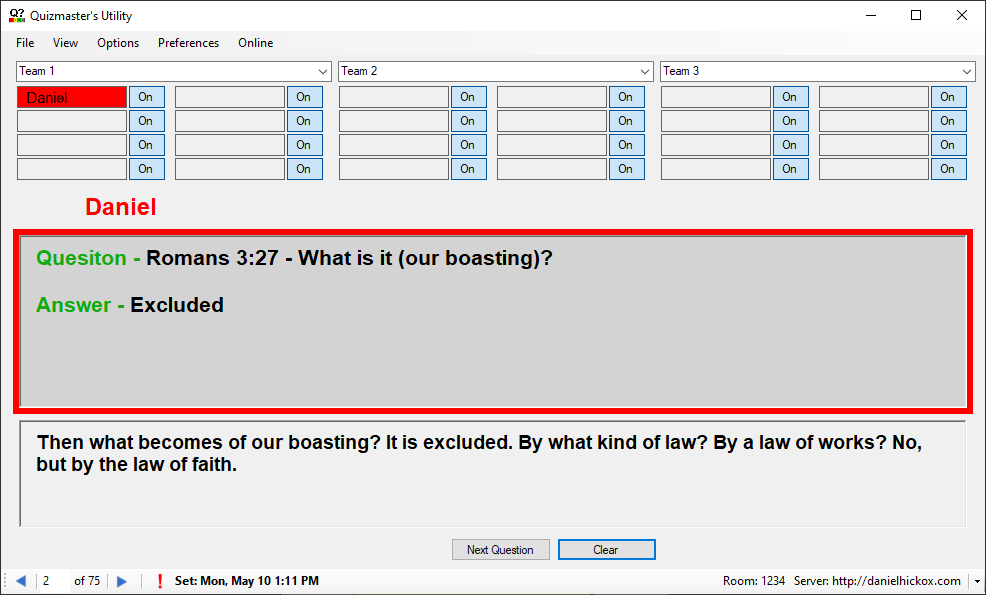
At the top of the main window are the seats. Seats are divided into teams, and teams can be named by typing into the team name box. If you press Enter/Return, the name in the box will be added to the dropdown selector.
Seats can be toggled on/off by clicking either the on/off button or the seat itself. By clicking and dragging over several seats, all those seats can be turned on/off at once.

The Textboxes
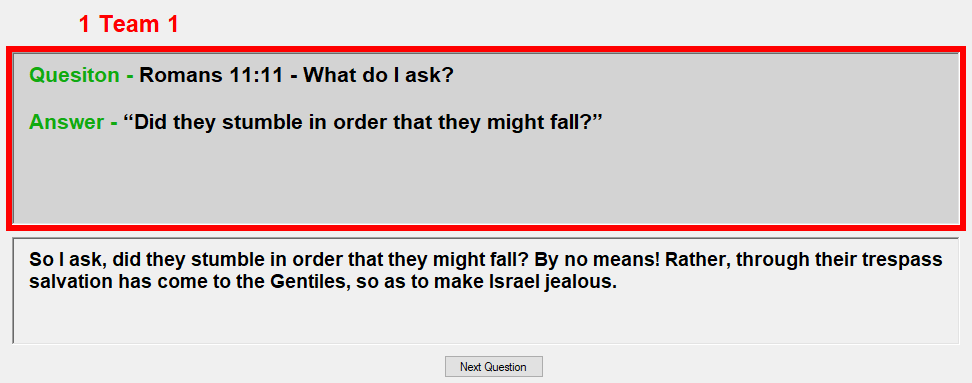
At the top is the first up text which is displayed when a light is on. Below that is the question box and the verse text box.
Hiding the Question
There are three ways to hide the question, which is recommended during timeouts and subs.
Via the hotkey: Ctrl+H. Via the menu, under View, choose Hide Question. Or by right-clicking on the question box.
Advancing the Question
There are several ways to navigate questions in the set. You can use the left/right arrow keys, press Enter/Return, or click the Next Question button.
At the very bottom of the Main Window is the Tool Bar.
The left/right arrows will navigate to the next/previous question in the set. Editing the number will jump you to the question that you entered.
The button with a red exclamation mark opens the Bad Question dialogue.
The "Set" text displays when the current set was generated.
To the right is text displaying the hub's status.
Farthest to the right is a little arrow that opens the Admin menu.

View
Hide Question
Hides/Reveals the question.
Show Other Questions
Adds a textbox that displays all of the questions in the current verse.
Show Timer
Adds a clock and question timer to the bottom right. Right-click on the clock to reset it. Quote adds 10 seconds. You can start the timers by clicking on them or use Spacebar to reset and start the question timer.
Preferences
Only Show First Up
When enabled, only the first light that comes on is fully displayed. Other lights that are on have a faint green tint but don’t catch the eye.
Use Small Light Style
When enabled, the light boxes are much smaller and centered on the screen. The intent is to allow all the lights to be equally in view while reading the question.
Indent Question
When enabled, the first line of the question is indented toward the center of the screen.
Show Light Toggles
When enabled, each light has an on/off toggle under it. These buttons are not necessary since clicking the light itself serves the same function. If you prefer a cleaner look, you can turn them off.
Enable Highlighter
When enabled, a single left-click on the question text highlights the question up to the letter clicked. Use this to mark how much of the question you have read or any other use you can devise.
First Light Hides Question
When enabled, the question will disappear and the screen will turn red when the first light comes on. The question reappears after one second.
Online Quizzing
To enable Online Quizzing, from the Admin Menu (little arrow at the bottom right), choose Online Quizzing.
This reconfigures the program to get light states from an online server rather than the USB hub.
Under the Online menu, you can open a dialogue to change the server address and room name. There's a server at: https://quizzing.live
The webpage: quizzing.live/quiz/ contains a list of rooms. Entering a room takes you to: quizzing.live/pad/ There you can edit your room, choose a team, and enter your name. Pressing Jump causes your light to turn on.
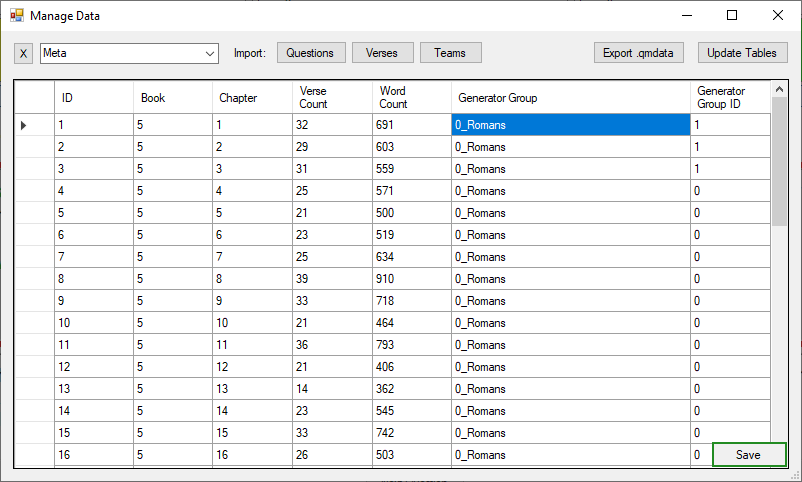
The Data Viewer
To show the data viewer, from the Admin Menu (little arrow at the bottom right), show the tools and then choose Data Viewer. (Ctrl+Shift+D)
The X button clears the selected table.
The dropdown lets you select a table to inspect.
The three buttons, Questions, Verses, and Teams, open a browser to import data from a .txt file. All of the import functions append the imported data to the data that is already in the database. For info about these files: See File Formats
Export .qmdata saves the current database to a shareable file, which you can import into other instances of Quizmaster's Utility. See Loading Questions
Update Tables clears the entire database. Use this as a starting point for a new data set.
Creating Your Own Data Set
To start from scratch, click the Update Tables button.
Import one or more text documents containing verses and one or more text documents containing questions.
From the dropdown selector, choose the Import Log table. Check for any skipped lines that should have been included. Skipped lines that are not listed were blank.
If there are issues, such as a missing question mark, edit the text document and repeat the above steps.
Once you are satisfied that the data imported correctly, select the Meta table from the dropdown selector. You can edit the column named Generator Group to control the grouping of chapters in the New Quiz dialogue. These groups are sorted alphabetically. To change the order in which groups appear, you can add a numeric prefix. eg. "1_GroupName". These prefixes do not appear in the New Quiz dialogue.
Once you have grouped the chapters as you see fit, click Save at the bottom right of the spreadsheet.
Click Export .qmdata to save your data set.
Questions:
The official BQF question documents, saved as plain text, should be in the correct format. Each line can contain a question. The format is:
Book 1:23 What am I? A question and this is an answer.
Verses:
Similar to the questions, each line can contain a verse. The format is:
Book 1:23 The full text of the verse.
For both questions and verses, defining the book is optional. If the book is not defined in the file, a dialogue box will appear, asking you to choose the correct book.
Teams:
Each line contains one team name.
Question Sets:
TSV (Tab Separated Value) format, each line/row contains one question. Each column (delimited by a tab) contains a bit of data, the columns are:
Column A:
Column B:
Column C:
Column D:
Column E:
Column F:
Book:
Chapter:
Verse:
Question:
Answer:
Text:
eg. John
eg. 11
eg. 35
eg. Who wept?
eg. Jesus
eg. Jesus Wept.

Daniel Hickox - 2021